How to Remove Green Screen in Streamlabs: A Step-by-Step Guide
Removing a green screen in Streamlabs is simple. This guide will show you how.
Green screens are popular in live streaming. They help create a professional look by allowing you to replace your background. Whether you’re new to streaming or just new to Streamlabs, learning how to remove your green screen is essential. This skill can improve your stream’s quality, making it more appealing to viewers.
Let’s dive into the basics of using Streamlabs to remove your green screen and enhance your live streaming experience.
Introduction To Green Screen Removal
Have you ever wondered how to make your streaming background more exciting? Removing the green screen in Streamlabs can help you create a professional look without a lot of effort. Let’s dive into how green screen removal works and why it’s beneficial for your streaming setup.
Purpose Of Green Screen
Green screens are a powerful tool for streamers. They allow you to replace your background with anything you want. This can be a cool image, a video, or even a live game feed.
Using a green screen makes your stream more engaging. It helps you stand out and keeps your audience entertained. Plus, it gives you the freedom to be creative with your background.
Benefits In Streaming
Removing the green screen in Streamlabs has several benefits. Firstly, it makes your stream look more professional. A clutter-free background keeps the focus on you and your content.
Secondly, it can enhance your brand. You can add custom backgrounds that match your style or theme. This consistency helps viewers remember you.
Finally, it can improve viewer retention. A visually appealing stream attracts and keeps viewers. They are more likely to return if they enjoy what they see.
Have you tried using a green screen in your streams? How did it change your setup and viewer engagement? Share your experiences in the comments below!

Credit: www.youtube.com
Preparing Your Setup
Preparing your setup for removing the green screen in Streamlabs is crucial. An organized and well-prepared setup ensures a smooth process. It also enhances the quality of your final output. Follow these simple steps to get started.
Choosing The Right Green Screen
The first step is selecting the right green screen. Choose a green screen that fits your space. It should cover the entire area behind you. A wrinkle-free fabric works best. It ensures even color throughout. If possible, opt for a professional-grade screen. It provides better results.
Lighting Considerations
Good lighting is essential for a clean green screen effect. Set up lights to illuminate the green screen evenly. Avoid shadows and dark spots. Use soft, diffused lighting for the best outcome. Place lights on both sides of the screen. This minimizes shadows and creates a smooth background.
Also, light yourself properly. Use a separate light source for this. It helps to distinguish you from the background. This makes the green screen removal process easier.
Installing Streamlabs
Installing Streamlabs is the first step to removing green screen from your live streams. Streamlabs is a powerful tool that offers many features for streamers. It is user-friendly and compatible with various platforms. Let’s start with the installation process.
Download And Install
First, visit the Streamlabs website. You will find the download button on the homepage. Click it to start the download. Once the download is complete, locate the file. Open it to begin the installation process. Follow the on-screen instructions. It will guide you through the installation steps. The process is straightforward and quick.
Initial Configuration
After installing Streamlabs, open the application. You will be prompted to log in. Use your streaming platform credentials. After logging in, you will see the main dashboard. Take a moment to explore the layout. It will help you get familiar with the interface. You need to configure your settings next.
Go to the settings menu. Adjust the video and audio settings according to your preferences. Ensure your webcam is connected. Check the resolution and frame rate. These settings are crucial for a smooth streaming experience. Once configured, you are ready to remove the green screen.
Setting Up Your Green Screen
Easily remove the green screen in Streamlabs by using the Chroma Key filter. Adjust the settings for a clean background. Follow these steps to enhance your streaming experience.
Setting up your green screen for Streamlabs can seem daunting at first, but it’s actually quite straightforward. Whether you’re a seasoned streamer or just starting, getting your green screen right will make a big difference in your stream quality. Here’s how you can set it up effectively.Positioning The Screen
First, find a suitable spot for your green screen. Make sure the area is well-lit and free from shadows. Ideally, you want to place your green screen a few feet behind you to avoid casting shadows on it. If space is an issue, consider using a collapsible green screen. They are compact and easy to store when not in use. Ensure your green screen covers the entire background visible in your camera frame. You don’t want any edges peeking out.Optimizing Lighting
Lighting is crucial for a smooth chroma key effect. Position your lights to evenly illuminate the green screen without creating hot spots or shadows. Consider using softbox lights for a more diffused and even light. Place them at an angle to avoid glare. You might also need a separate light source for yourself. This prevents you from blending into the green screen. Ring lights work well for this purpose. Lastly, test your setup in Streamlabs before you start streaming. Adjust the brightness and contrast as needed to get the best result. Have you ever struggled with shadows or lighting issues? Share your experiences and tips in the comments!Configuring Streamlabs For Green Screen
Configuring Streamlabs for Green Screen can seem like a daunting task, but it’s actually quite straightforward. With just a few steps, you can elevate your streaming experience and impress your audience. Let’s dive into the specifics and get your green screen up and running seamlessly.
Adding A New Scene
First things first, you need to add a new scene in Streamlabs. This is the foundation where all your video sources and overlays will reside.
Click on the “+” icon under the “Scenes” section in Streamlabs. Name your new scene something memorable like “Green Screen Setup”. Now, you’ve got a blank canvas to work with.
Adding a new scene is like setting up a new stage for your show. Everything you add here will be visible to your audience.
Selecting The Video Source
Next, you need to select your video source. This is where your webcam or camera feed will come in.
Click the “+” icon under the “Sources” section and choose “Video Capture Device”. Select your camera from the list of available devices. This will bring your video feed into the scene.
Your video source is the key player in your green screen setup. Make sure the camera feed is clear and well-lit for the best results.
Now that you’ve added your scene and selected your video source, you’re well on your way to mastering the green screen setup in Streamlabs. Have you ever wondered how professional streamers achieve that seamless background effect? It’s all about these initial setup steps. Stick around as we delve further into fine-tuning your green screen settings to make your streams look flawless.

Credit: www.youtube.com
Applying Chroma Key Filter
Streamlabs makes it easy to remove a green screen using the Chroma Key filter. This feature helps you blend your background seamlessly. Follow these steps to apply the Chroma Key filter.
Accessing Filters Menu
First, open Streamlabs and select your video capture source. Right-click on the source to bring up a menu. Choose “Filters” from the menu. This will open the Filters window. Here, you can add and adjust filters.
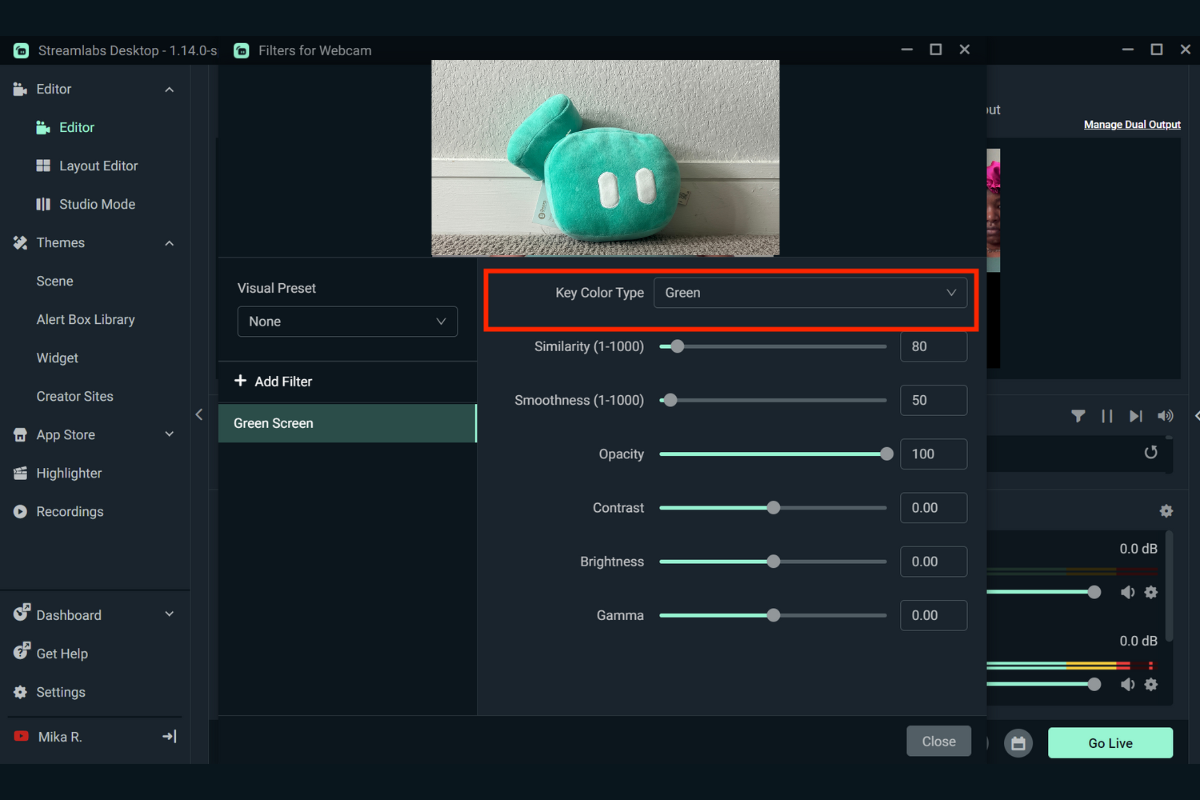
Adjusting Chroma Key Settings
In the Filters window, click the “+” button at the bottom left. Select “Chroma Key” from the list of filters. A new window will appear with various settings. Adjust the settings to match your green screen. You can tweak the similarity, smoothness, and key color spill reduction. These settings help fine-tune the Chroma Key effect. Test your settings until the background is fully removed.
Fine-tuning The Green Screen Effect
Streamlabs makes it easy to remove the green screen effect for a clean, professional look. Adjust settings to enhance the visual quality. Perfect your background with just a few clicks.
Fine-tuning the green screen effect in Streamlabs can make all the difference in the final quality of your video. It’s not just about removing the green background; it’s about ensuring your image looks clean and professional. Let’s dive into some practical tips to help you achieve the best results.Adjusting Similarity And Smoothness
Start with the similarity setting. This controls how much of the green screen is removed. Increase it gradually until most of the green disappears. Be careful not to overdo it, as it might remove parts of your subject. Next, adjust the smoothness setting. This helps blend the edges of your subject with the background. Fine-tune it to make sure there are no harsh lines. Remember, the goal is a seamless integration.Eliminating Shadows And Artifacts
Shadows can be tricky. They often appear as dark spots or outlines around your subject. Position your lighting to minimize shadows. Use multiple light sources if possible. Artifacts are unwanted visual glitches. They can appear as flickering or pixelated areas. Check your lighting and green screen material. A smooth, well-lit green screen reduces artifacts. What challenges have you faced with green screen effects? Share your experiences and tips below!Testing And Troubleshooting
Remove the green screen in Streamlabs by accessing the Filters tab. Adjust the chroma key settings to eliminate unwanted green hues. Save your changes for a seamless streaming experience.
When you’re using Streamlabs for your live streams, removing the green screen properly is crucial. But even after setting it up, you might face some hiccups. That’s where testing and troubleshooting come into play. These steps ensure everything runs smoothly, giving you a polished, professional look.Conducting Test Streams
Before going live, always conduct test streams. This helps you identify any green screen issues early. Check if your background is consistently removed. Look out for any flickering or transparency problems. Streamlabs allows you to record locally. Use this feature to review your test stream and make necessary adjustments.Common Issues And Fixes
One common issue is uneven lighting. If your green screen is not evenly lit, it can cause shadows and poor keying. Adjust your lighting setup to ensure even brightness across the screen. Softbox lights can be very effective here. Another problem could be the settings in Streamlabs. If the chroma key settings are too aggressive, they might remove parts of you or your props. Fine-tune the similarity and smoothness settings until you find the perfect balance. Are you seeing a green outline around your body? That could be due to the green screen being too close. Try to maintain a good distance between you and the screen. What challenges have you faced while using green screens? Sharing your experiences can help others in the community.Conclusion And Tips
Removing a green screen in Streamlabs can enhance your streaming experience. This section covers best practices and tips for a seamless process. Understanding these tips can make your live streams look professional and engaging.
Best Practices
Ensure your green screen is wrinkle-free. Smooth surfaces provide better results. Proper lighting is essential. Use even lighting to avoid shadows. Adjust the chroma key settings in Streamlabs carefully. Find the balance that works for your setup.
Additional Resources
Streamlabs offers tutorials on their website. These guides can be helpful. Online forums and communities provide advice. Engage with other streamers for tips and tricks. Videos on YouTube can visually demonstrate the process. Watching these can make understanding easier.

Credit: streamlabs.com
Frequently Asked Questions
How To Remove Green Background In Streamlabs?
To remove the green background in Streamlabs, open your sources. Select your video source, click Filters, then add a Chroma Key filter. Adjust the settings until the green background disappears.
How Do I Turn On The Green Screen On Streamlabs?
Open Streamlabs, go to “Settings,” select “Video,” and enable the “Green Screen” option. Adjust settings as needed.
How To Get Rid Of Green Screen In Obs?
To remove the green screen in OBS, add a Chroma Key filter to your video source. Adjust the settings until the background is transparent.
How To Completely Remove Green Screen?
To completely remove a green screen, use video editing software like Adobe Premiere Pro or Final Cut Pro. Apply the chroma key effect, select the green color, and adjust the settings to refine the edges.
Conclusion
Removing a green screen in Streamlabs is simple. Follow the steps carefully. First, set up good lighting. Then, use the Chroma Key filter. Adjust settings until the background disappears. Your stream will look professional. Practice makes perfect. Soon, you’ll do it easily.
Green screen effects can enhance your content. Keep experimenting and improving. Happy streaming!