How to Configure OBS for Streaming: A Step-by-Step Guide
To configure OBS for streaming, follow these steps: First, install OBS Studio. Then, set up your stream settings.
OBS, or Open Broadcaster Software, is a powerful tool for live streaming. Whether you’re a gamer, artist, or just want to broadcast live, OBS has you covered. In this guide, we’ll walk you through the process of configuring OBS for the best streaming experience.
From setting up your video and audio inputs to optimizing your stream settings, you’ll find everything you need to go live smoothly. Get ready to share your content with the world. Let’s dive in and make your stream look professional and engaging!
System Requirements
If you’re looking to set up OBS for streaming, understanding the system requirements is crucial. Ensuring your computer meets these requirements will help you avoid technical glitches and provide a smooth streaming experience. Let’s break down the minimum requirements and recommended specifications to get you started.
Minimum Requirements
To run OBS, your computer needs to meet certain minimum specifications. These are the baseline requirements to ensure OBS operates without issues.
- Operating System: Windows 8, macOS 10.13, or Linux
- Processor: Dual-core Intel or AMD CPU (2 GHz or faster)
- RAM: 4 GB
- Graphics Card: DirectX 10 capable graphics card
If your system meets these minimum requirements, you can install and run OBS. However, for optimal performance, you might want to consider upgrading certain components.
Recommended Specifications
For a smoother streaming experience and better video quality, aim for the recommended specifications. These specs will help you handle higher resolutions and more complex scenes.
- Operating System: Windows 10, macOS 10.14, or Linux
- Processor: Quad-core Intel or AMD CPU (3 GHz or faster)
- RAM: 8 GB or more
- Graphics Card: DirectX 11 capable graphics card
Having these recommended specs will significantly enhance your streaming quality. For instance, when I upgraded my graphics card, the difference in video smoothness was noticeable.
Do you meet these requirements? If not, consider upgrading your system for better performance. Streaming can be demanding, but with the right setup, you can provide your viewers with high-quality content.
Credit: www.dacast.com
Downloading And Installing Obs
Setting up OBS for streaming involves a few simple steps. First, you need to download and install OBS. This will ensure you have the right tools to start streaming your content. Let’s break down the process into easy-to-follow steps.
Where To Download Obs
OBS stands for Open Broadcaster Software. It’s free and open-source. You can download it from the official OBS website. Just go to obsproject.com and click on the download button. Choose the version that matches your operating system.
Installation Process
After downloading the installer, open the file. Follow the on-screen instructions. The setup wizard will guide you through the installation process. Click ‘Next’ to move forward. Accept the license agreement. Choose your install location or use the default path. Click ‘Install’ to begin the installation. Wait for the process to complete.
Once installed, click ‘Finish’ to close the setup wizard. OBS is now ready to be configured for streaming. You can find it in your list of programs. Open OBS to start setting up your stream.
Initial Setup
Setting up OBS (Open Broadcaster Software) for streaming can be an exciting journey. The initial setup might seem daunting, but with a few straightforward steps, you can have your streaming gear ready in no time. Let’s dive into the essentials to get you started on your streaming adventure.
Creating A Profile
First things first, you need to create a profile. Profiles in OBS allow you to save different settings for various streaming or recording scenarios. Open OBS, click on the Profile tab at the top, and select New. Name your profile something memorable, like “Gaming” or “Podcasting”.
This profile will store your customized settings, making it easier to switch between different setups. It’s like having a personalized toolbox for each type of stream you want to run. If you ever need a different setup, you can simply create another profile.
Have you ever tried to stream without a profile? It can be chaotic switching settings manually every time. Profiles save you from this hassle, ensuring a smooth and consistent streaming experience.
Setting Up Scenes And Sources
Scenes and sources are the backbone of your stream layout. Think of scenes as different layouts or setups you switch between during your stream, and sources as the individual elements within those scenes.
Start by clicking the Scenes box at the bottom-left of OBS and hit the + button to create a new scene. Name it something simple, like “Main Scene”.
Next, you’ll need to add sources to this scene. Click the + button in the Sources box, and you’ll see a list of options like Display Capture, Video Capture Device, or Image. Select the appropriate source and configure it as needed.
For instance, if you want to add your webcam feed, select Video Capture Device, name it, and choose your webcam from the device list. Adjust the size and position of the webcam feed to fit your layout.
Don’t forget to add audio sources. Click the + button in the Audio Mixer to add your microphone or desktop audio. This ensures your viewers can hear you clearly.
Have you considered how your viewers will experience your stream? A well-organized scene with correctly configured sources keeps them engaged and coming back for more.
By setting up your scenes and sources thoughtfully, you’re creating a professional and polished stream. What unique elements will you add to make your stream stand out?
Configuring Video Settings
Setting up OBS for streaming involves adjusting video settings. Choose the right resolution and frame rate for smooth playback. Adjust bitrate to maintain quality without lag.
Configuring your video settings in OBS is crucial for delivering a smooth and high-quality stream. Correct settings ensure that your audience enjoys a clear and consistent viewing experience. Here, we’ll cover the essential aspects of configuring video settings, including resolution, FPS, and bitrate settings.Resolution And Fps
First, you need to decide on the resolution and FPS (frames per second) of your stream. Higher resolution means better quality but requires more processing power and internet bandwidth. A common choice is 1080p for a high-quality stream, but 720p can be a good alternative if your system or internet connection isn’t strong. FPS determines how smooth your video looks. Higher FPS (like 60) offers smoother motion, especially for fast-paced games. However, 30 FPS can be sufficient for casual streaming or less demanding content. Experiment with both to see what works best for you.Bitrate Settings
Bitrate affects the quality and smoothness of your stream. It’s the amount of data being uploaded per second. For 1080p at 60 FPS, aim for a bitrate between 4500-6000 kbps. For 720p at 30 FPS, a range of 2500-4000 kbps should suffice. These are just starting points, and you might need to adjust based on your internet speed. You can test your internet speed using tools like Speedtest.net. Make sure your upload speed supports your chosen bitrate. As a rule, your upload speed should be at least double your bitrate to avoid any interruptions. Are you ready to tweak your settings and see the difference in your stream quality? Don’t hesitate to experiment and find what works best for your unique setup. Remember, the goal is to provide your viewers with the best possible experience. Happy streaming!Configuring Audio Settings
Configuring the audio settings in OBS (Open Broadcaster Software) is crucial for a great streaming experience. Proper audio settings ensure clear sound and enhance viewer engagement. Let’s dive into setting up audio devices and adjusting the audio bitrate.
Audio Devices
First, open OBS and go to the Settings menu. Select Audio from the side panel. Here, you can choose your audio devices. Set the Desktop Audio to your default playback device. This device captures sound from your computer. For example, game sound or music.
Next, select your microphone under Mic/Auxiliary Audio. This device captures your voice. Ensure the correct device is selected to avoid audio issues. You can also add more audio devices if needed. For instance, an additional microphone for a guest.
Audio Bitrate
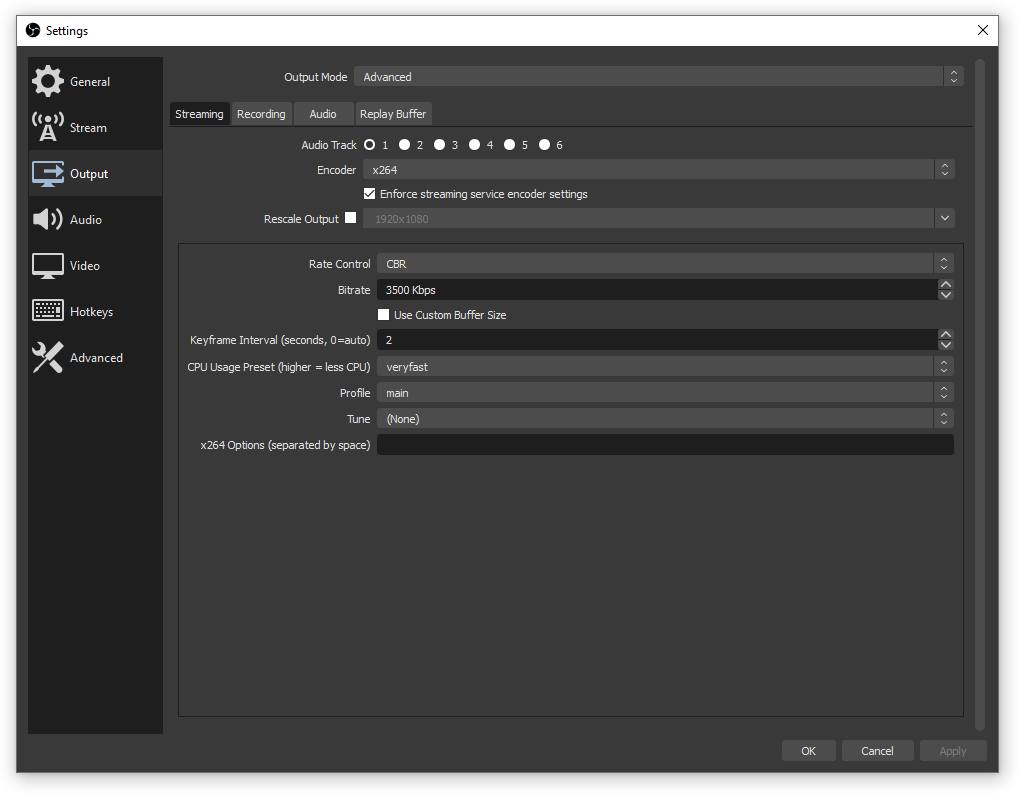
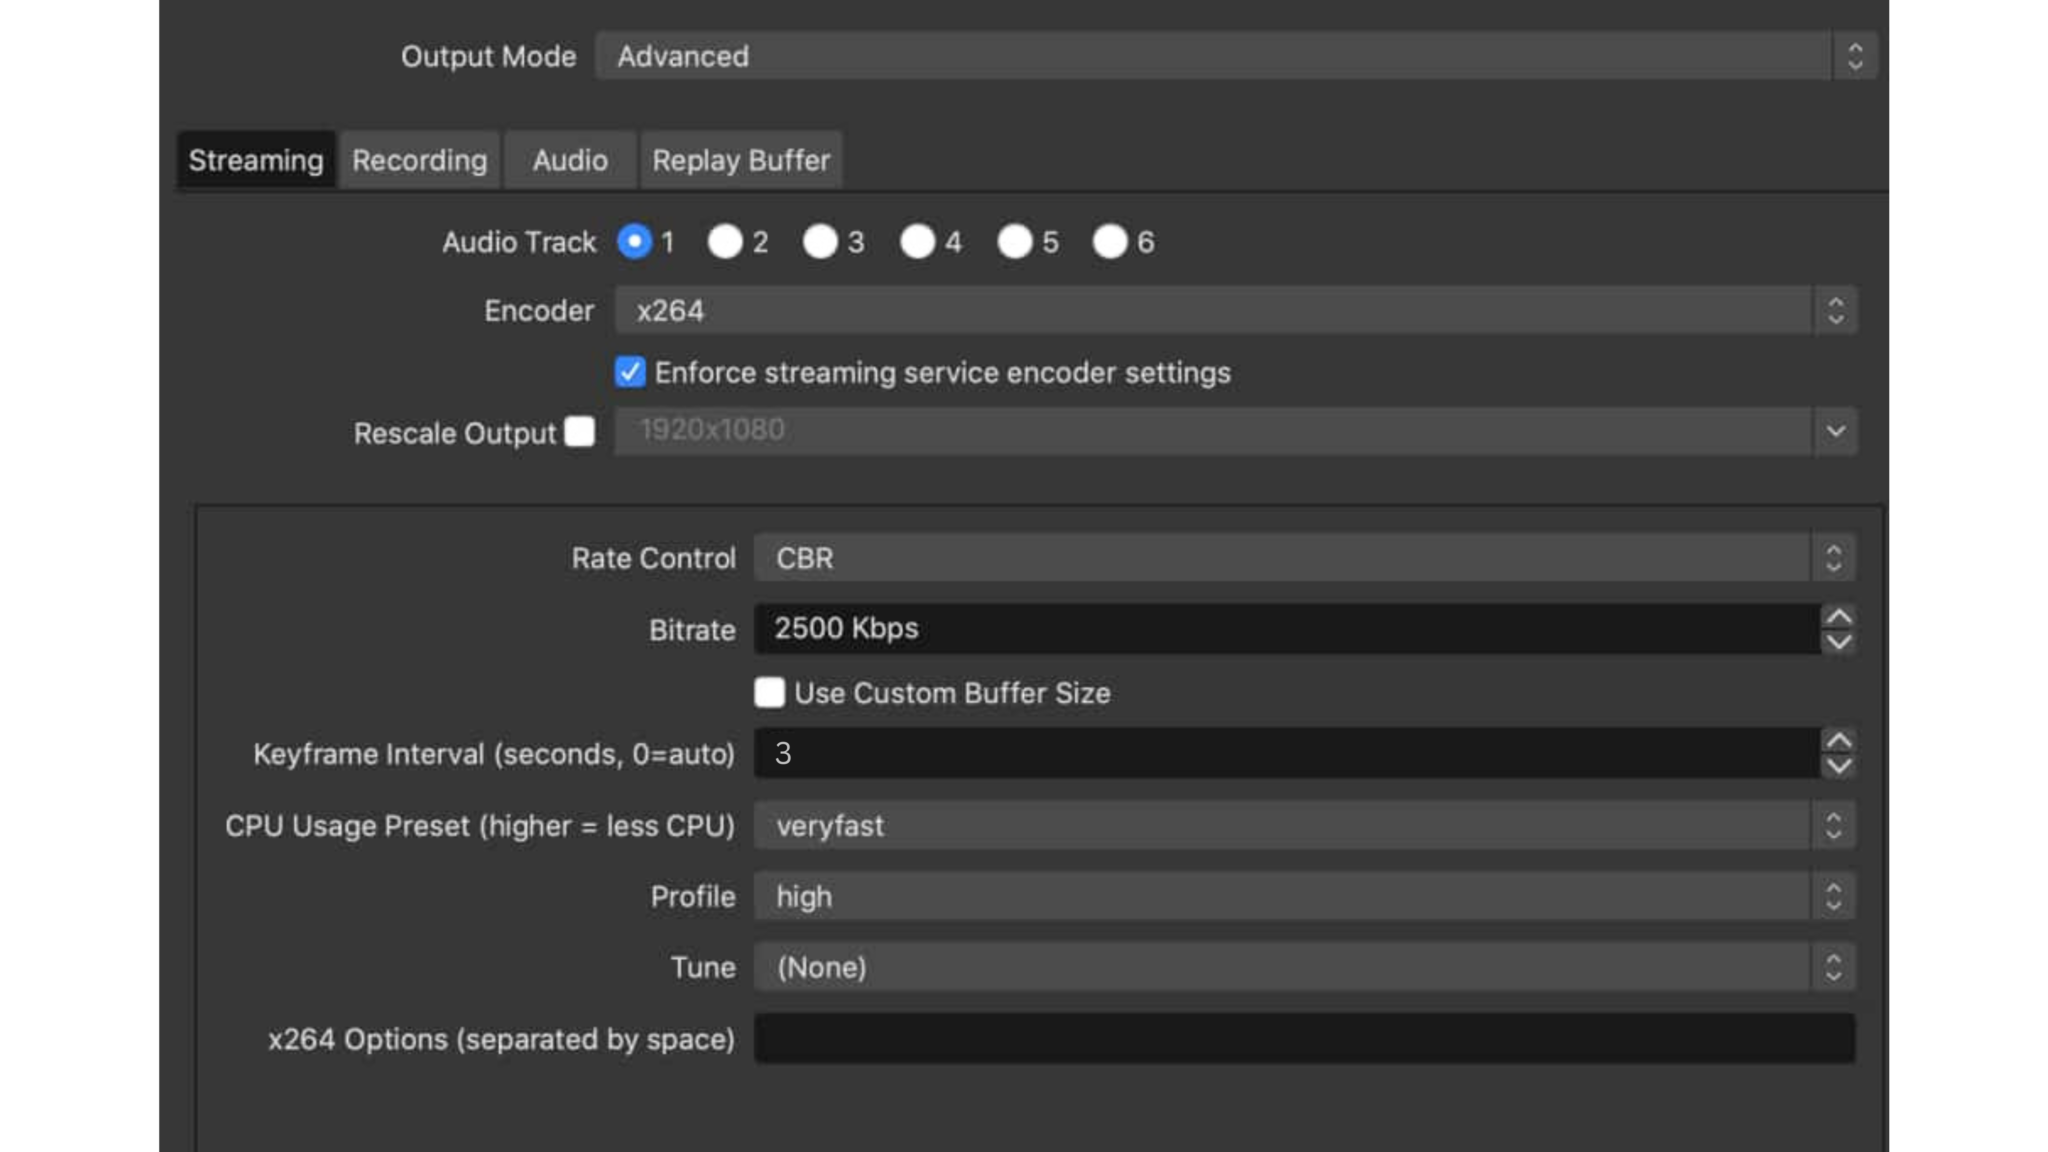
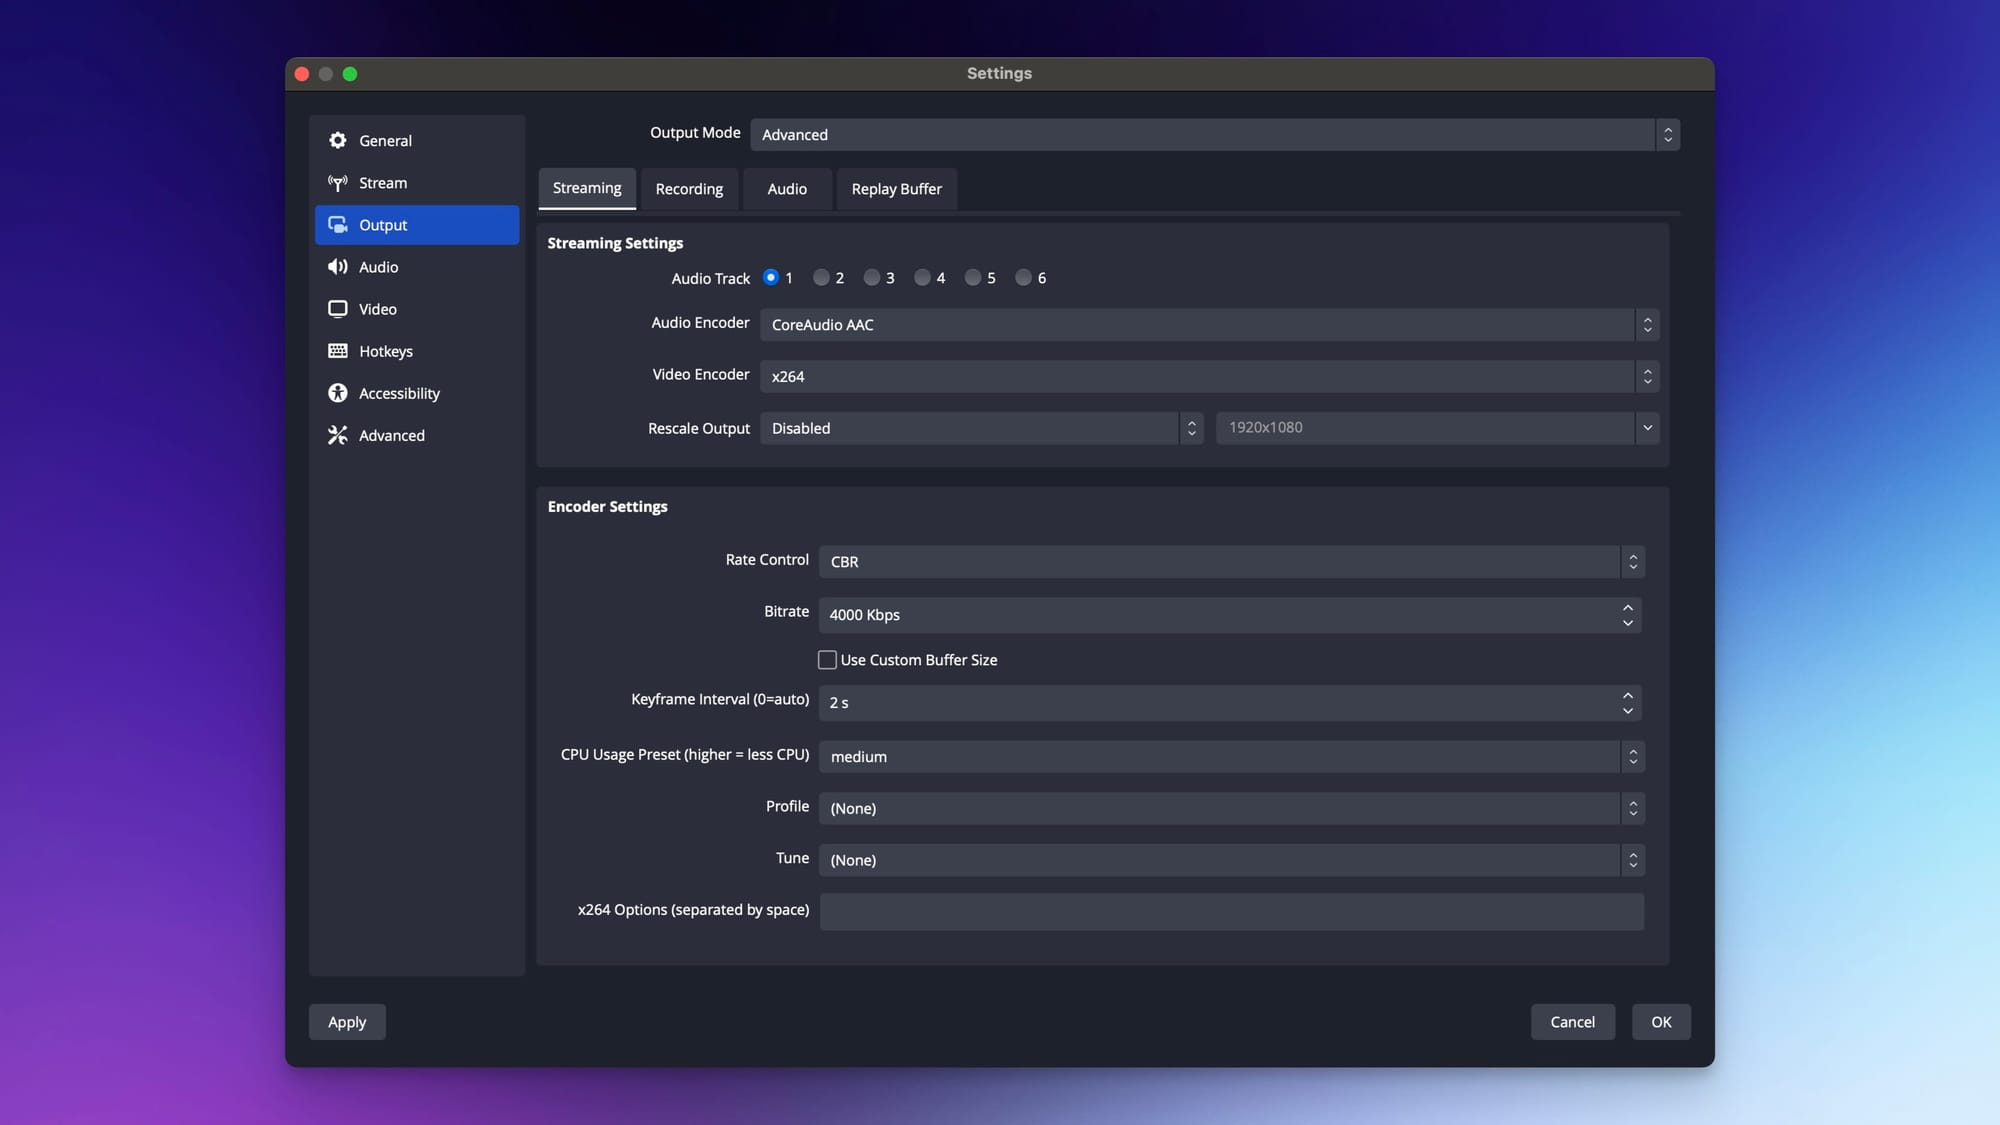
Now, adjust the audio bitrate. The bitrate affects the audio quality of your stream. Go to the Output tab in the Settings menu. Under Streaming, you will see the audio bitrate option.
For most streams, a bitrate of 128 kbps is sufficient. This setting provides good quality without using too much bandwidth. If you need higher quality, consider increasing it to 192 kbps. But remember, higher bitrate uses more internet bandwidth. Choose a setting that balances quality and bandwidth usage.
After configuring these settings, click Apply and then OK to save changes. Test your stream to ensure everything sounds perfect.
Optimizing Stream Settings
Optimizing stream settings in OBS ensures a smooth streaming experience. Proper settings reduce lag, enhance video quality, and improve viewer satisfaction. This section covers key areas to focus on for optimal performance.
Encoder Settings
Choosing the right encoder is crucial for stream quality. OBS offers two main options: x264 (software) and NVENC (hardware). x264 uses your CPU, offering high-quality output but may strain your system. NVENC uses your GPU, providing excellent performance without stressing your CPU.
For most users, NVENC is the preferred choice. It balances quality and performance well. If your CPU is powerful, consider x264 for potentially better quality. Experiment with both to see which works best for your setup.
Stream Key Setup
Your stream key is essential for streaming to platforms like Twitch, YouTube, and Facebook. To find your stream key, log into your streaming platform account. Look for the settings or dashboard section. Copy the stream key provided.
In OBS, go to the Settings menu, then navigate to the Stream tab. Select your streaming service from the dropdown menu. Paste your stream key into the appropriate field. This connects OBS to your streaming platform.
Always keep your stream key private. Sharing it can allow others to stream on your account.
Testing Your Stream
Configuring OBS for streaming involves setting up the software to capture and broadcast your screen. Adjust video and audio settings, and choose the best bitrate. Ensure a smooth stream by testing different configurations.
Configuring OBS for streaming can be an exciting yet challenging process. Once you’ve set up your OBS settings, the crucial next step is testing your stream. This ensures that your audience enjoys a seamless viewing experience. Let’s dive into how you can effectively test your stream.Running A Test Stream
Running a test stream is essential. It allows you to see how your setup performs in real-time without going live to your entire audience. Start by setting your stream to “Private” or “Unlisted” on your streaming platform. This way, only you can see it. Pay attention to the audio and video quality. Are they in sync? Is the video lagging? Adjust your settings if necessary. Change the bitrate, resolution, or frame rate until you find the best combination. Use OBS’s built-in tools to help you gauge these adjustments.Monitoring Performance
Monitoring performance during your test stream is key. Keep an eye on your CPU usage and dropped frames. OBS has a status bar at the bottom that displays this information. High CPU usage or dropped frames can indicate issues. You might need to lower your settings or upgrade your hardware. Check your internet speed as well. A stable connection is vital for a smooth stream. Websites like Speedtest.net can help you verify your upload speed. Engage with these metrics to ensure everything runs smoothly. Are you experiencing buffering or lag? Address these issues before going live. Testing your stream thoroughly gives you the confidence to provide an enjoyable experience for your viewers. What steps will you take to ensure your stream is flawless?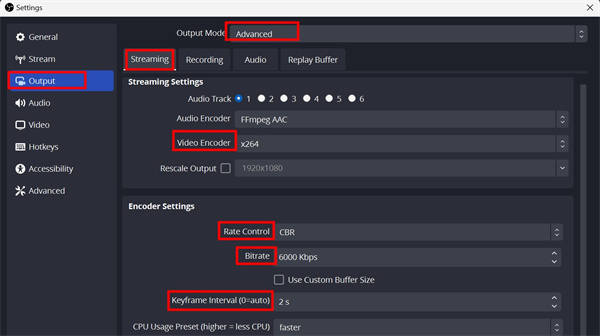
Credit: www.obsbot.com
Troubleshooting Common Issues
Setting up OBS for streaming can be tricky. Common issues include incorrect settings, audio problems, and poor video quality. Follow these steps to configure OBS smoothly for your streaming needs.
Configuring OBS for streaming can seem like a daunting task, especially when you encounter common issues that disrupt your smooth streaming experience. Lag, buffering, and audio sync issues are some of the most frequent problems that streamers face. Addressing these issues promptly can make your streams more enjoyable for your audience. Let’s dive into troubleshooting these common issues.Lag And Buffering
Lag and buffering can be a nightmare for streamers. They frustrate viewers and disrupt your content delivery. Start by checking your internet connection. Ensure that your upload speed meets the requirements of your streaming platform. Lowering your bitrate settings in OBS can help. A lower bitrate reduces the amount of data being sent, easing the load on your connection. Don’t forget to close any background applications that may be using your bandwidth. This simple step can free up resources for a smoother streaming experience.Audio Sync Issues
Audio sync issues can make your stream unwatchable. If your audio is out of sync with your video, viewers will quickly lose interest. First, check if your audio input settings in OBS are correctly configured. Sometimes, a slight adjustment can solve the problem. Another common fix is to add a delay to your audio. OBS allows you to sync your audio with your video by adding a delay in milliseconds. Experiment with different values to find the perfect match. If these fixes don’t work, consider updating your audio drivers. Outdated drivers can sometimes cause sync issues. Have you ever encountered these issues during your streaming sessions? How did you resolve them? Share your experiences in the comments below.Advanced Tips
Configuring OBS for streaming can seem complex. Once you master the basics, diving into advanced tips can elevate your stream. Two crucial areas to focus on are using plugins and customizing overlays. These tips will help you create a unique and engaging streaming experience.
Using Plugins
Plugins enhance OBS functionality. They offer new features and customizations. To install plugins, visit the OBS forums or other trusted sources. Download the plugin files. Place them in the OBS plugins folder. Restart OBS to enable the new plugins.
Some popular plugins include StreamFX and OBS WebSocket. StreamFX adds visual effects. OBS WebSocket allows remote control of OBS. Both can improve your streaming workflow. Explore various plugins to find what works best for your needs.
Customizing Overlays
Overlays add personality to your stream. They can display alerts, chat, and more. Create custom overlays using graphic design software. Tools like Photoshop or GIMP work well. Save your designs as PNG files for transparency.
Import your overlays into OBS as image sources. Position them on your screen. Use the Transform tool to resize and align them. Ensure your overlays complement your content. Avoid cluttering the screen.
Experiment with different styles. Find what resonates with your audience. Custom overlays make your stream stand out. They also enhance viewer engagement.
Credit: restream.io
Frequently Asked Questions
What Should My Obs Settings Be For Streaming?
Set video bitrate to 2500-4000 kbps, audio bitrate to 160 kbps. Use x264 encoder, 720p resolution, 30 FPS for smooth streaming.
How To Set Up Stream Layout Obs?
Open OBS and go to “Scenes”. Click the “+” button to add a new scene. Go to “Sources” and click “+” to add video, images, or text. Arrange and resize elements as needed. Save your layout.
What Is The Best Encoder For Obs Streaming?
The best encoder for OBS streaming is the NVIDIA NVENC. It offers excellent quality and low CPU usage.
How Do I Change Obs Settings While Streaming?
Open OBS and go to “Settings. ” Adjust streaming settings as needed. Changes apply immediately without stopping the stream.
Conclusion
Setting up OBS for streaming is simpler than it seems. Follow the steps and you’ll be streaming in no time. Experiment with different settings to find what works best. Practice makes perfect. Remember, good audio and video quality keep viewers engaged.
Happy streaming!