How to Change Stream Title on Twitch: Step-by-Step Guide
Changing your stream title on Twitch can seem tricky at first. But with a few simple steps, you can update it in no time.
Streaming on Twitch is a great way to connect with viewers. The stream title is crucial because it tells viewers what your stream is about. A clear and catchy title can attract more viewers. Sometimes, you need to change the title to reflect new content or events.
Knowing how to do this quickly and easily is important. In this guide, we will walk you through the steps to change your stream title on Twitch. Whether you are on a desktop or mobile, the process is simple and straightforward. Let’s get started!
Credit: www.alphr.com
Setting Up Your Twitch Account
Setting up your Twitch account is the first step to becoming a successful streamer. It is straightforward and does not take much time. Follow these steps to get started and set the foundation for your streaming career.
Creating An Account
First, visit the Twitch website. Click on the “Sign Up” button. A form will appear. Fill in your details like username, password, and email. Choose a unique username. This name will be your identity on Twitch. Make sure to use a valid email. You will need to verify it later. Once done, click “Sign Up”. Check your email for a verification link. Click on the link to verify your account. Now, your Twitch account is ready.
Navigating The Dashboard
After creating your account, log in. You will see the Twitch homepage. Look for your profile icon in the top-right corner. Click on it. A dropdown menu will appear. Select “Creator Dashboard”. This is where you will manage your streams. Familiarize yourself with the dashboard. You will find sections like Stream Manager, Analytics, and Settings. Each section helps you in different ways. Stream Manager is the most important. Here, you can update your stream title. Explore other sections too. They provide useful tools and insights. Spend some time here to understand all features.
Accessing The Stream Manager
Accessing the Stream Manager is essential for any Twitch streamer looking to keep their stream organized and engaging. Whether you’re updating your stream title or managing your chat, the Stream Manager is your control hub. Let’s dive into how you can access and make the most of it.
Finding The Stream Manager
First, log into your Twitch account. Once you’re in, click on your profile picture located at the top-right corner of the screen.
A dropdown menu will appear. Select “Creator Dashboard.” This action will direct you to a new page dedicated to managing your streams.
On the left-hand sidebar, you will see various options. Click on “Stream Manager.” Here, you can control almost every aspect of your live broadcast.
Understanding Its Features
The Stream Manager is packed with features designed to help you run a smooth stream. One of the key features is the “Quick Actions” panel.
This panel allows you to change your stream title, set the game category, and even run ads with just a few clicks. It’s highly customizable, so you can add or remove actions based on your needs.
Another vital feature is the “Activity Feed.” This section shows you everything happening in your stream in real-time, from new followers to chat activity.
Do you ever wonder how top streamers stay so engaged with their audience? They actively monitor their Activity Feed. This way, they never miss a beat when interacting with viewers.
Managing your stream is crucial for building an engaged audience. Have you ever had a great stream idea but didn’t know how to change your title mid-stream? Now you do! With the Stream Manager, you can make those changes seamlessly.
So, the next time you’re live, make sure to leverage these features. Your viewers will appreciate the effort, and you’ll enjoy a more organized streaming experience.
Changing Your Stream Title
Your stream title on Twitch plays a big role in attracting viewers. A catchy title can make people click on your stream. It also helps viewers know what to expect. Changing your stream title is easy and can be done in a few steps.
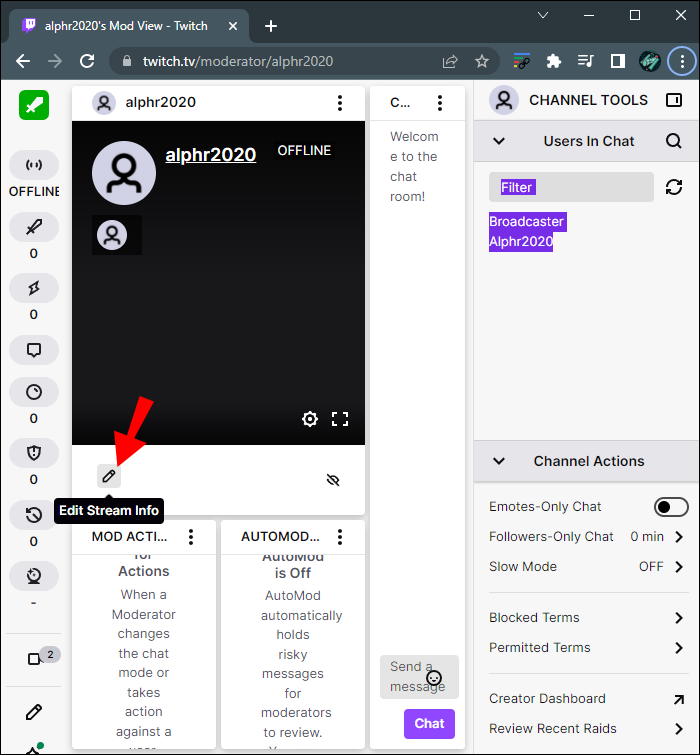
Locating The Title Field
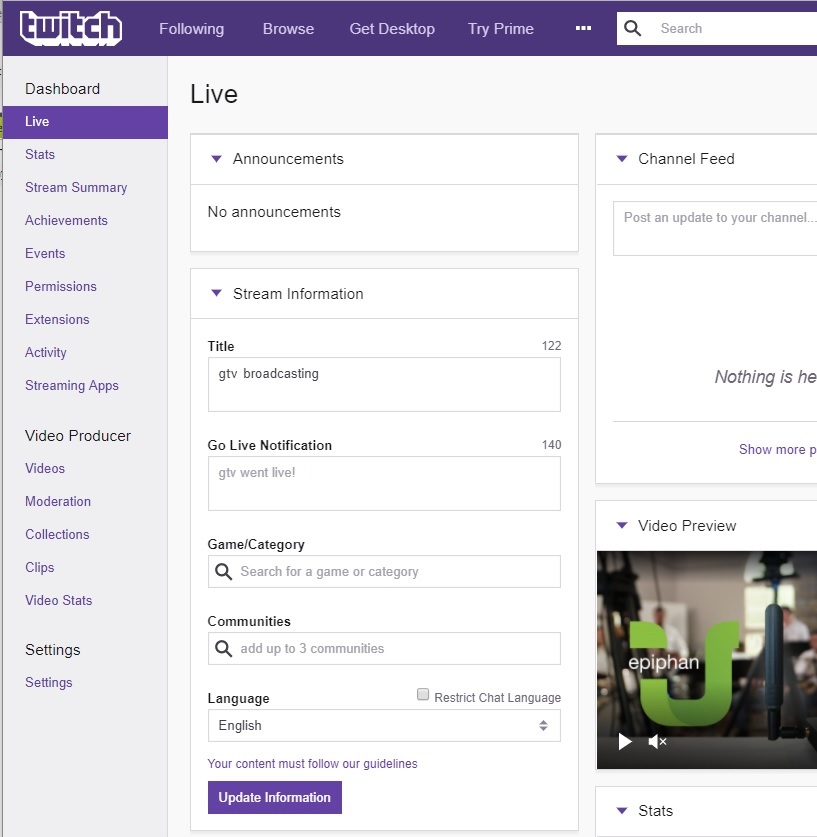
First, you need to find the title field. Go to your Twitch dashboard. Look for the section called “Stream Information”. This is where you can edit your stream title. The title field is easy to spot.
Editing The Title
Once you locate the title field, click on it. You can now type your new stream title. Make sure your title is clear and interesting. It should reflect the content of your stream. Keep it short and catchy. After editing, click “Update”. Your new title will be saved.
Tips For Effective Stream Titles
Crafting effective stream titles on Twitch involves clear, engaging language. Change your title through your dashboard settings easily. Catchy titles attract viewers and improve discoverability.
Crafting effective stream titles on Twitch can significantly enhance your channel’s visibility and attract more viewers. A well-thought-out title can make a difference between someone clicking on your stream or scrolling past it. Let’s dive into some tips for creating engaging and effective stream titles.Using Keywords
Keywords are essential in stream titles. They help potential viewers find your stream when searching for specific content. Think about what words your audience might use to find streams like yours. For example, if you’re playing a popular game like “Fortnite,” include the game’s name in your title. Combine it with other relevant keywords like “live,” “gameplay,” or “strategy.” Consider adding trending topics or events related to your stream. This can draw in viewers interested in current happenings.Keeping It Concise
A concise title is more appealing and easier to read. Avoid long and complicated titles that might confuse your audience. Stick to essential information that conveys what your stream is about. For instance, “Epic Fortnite Battle Royale – Live Now!” is clear and to the point. It tells viewers exactly what they can expect. Try breaking down your title into short, impactful phrases. This makes it easier for viewers to quickly understand the content of your stream. Effective stream titles can boost your channel’s visibility and engagement. Use keywords strategically and keep your titles concise to attract more viewers. What techniques do you use for your stream titles? Share your tips in the comments below!Common Mistakes To Avoid
Changing your stream title on Twitch seems simple. But many make common mistakes. These errors can hurt your channel’s growth. Learning what to avoid can help you create better titles.
Avoiding Clickbait
Clickbait titles can attract viewers quickly. But they also lead to disappointment. If your title does not match your content, viewers may leave. This can hurt your retention rate. Always ensure your title is accurate.
Using Proper Grammar
Grammar mistakes can make your stream look unprofessional. Viewers might think you do not care about quality. Proofread your titles before going live. A well-written title can attract more viewers. It shows that you value your stream.

Credit: www.youtube.com
Updating Titles On Different Devices
Change your Twitch stream title easily on different devices. Adjust the title on both desktop and mobile. Keep your audience informed and engaged.
Updating your stream title on Twitch is crucial for attracting viewers and keeping your content organized. Whether you’re streaming from a desktop or mobile device, knowing how to update your titles is essential. Here’s a step-by-step guide to help you manage your stream titles on different devices.Changing Titles On Desktop
Updating your stream title on a desktop is straightforward. Start by logging into your Twitch account. Click on your profile icon at the top-right corner and navigate to the “Creator Dashboard.” In the Creator Dashboard, look for the “Stream Manager” tab on the left-hand side. Here, you’ll find a section labeled “Edit Stream Info.” Click on it, and a pop-up window will appear. In the pop-up, you can change your stream title. Make sure it’s catchy and relevant to your content. Once you’re satisfied with your new title, hit the “Done” button to save the changes.Changing Titles On Mobile
Changing your stream title on mobile is just as easy. Open the Twitch app on your mobile device and log in to your account. Tap on your profile icon located at the top-left corner to access your profile. From your profile page, tap on the “Go Live” button. This will take you to a screen where you can set up your stream. Look for the “Edit Stream Info” option. Here, you can update your stream title. Ensure it’s engaging and reflects your current content. After updating, tap the “Save” button to apply the changes. — Updating your stream title regularly can make a big difference in attracting viewers. Have you noticed an increase in viewers after changing your title? Share your experiences in the comments below!
Credit: www.youtube.com
Frequently Asked Questions
How Do I Change My Twitch Stream Title?
To change your Twitch stream title, go to your Creator Dashboard. Click on “Edit Stream Info” and update the title. Save the changes.
How Do I Change My Stream On Twitch?
To change your stream on Twitch, go to your Dashboard. Click on “Stream Manager,” then select “Edit Stream Info. ” Update your title, category, and tags. Save changes.
How Do I Change My Twitch Stream Info?
To change your Twitch stream info, go to your Dashboard. Click on “Edit Stream Info,” update details, and save.
How Do I Change My Twitch Display Name?
To change your Twitch display name, go to Settings, select Profile, and edit your Username. Save changes.
Conclusion
Changing your stream title on Twitch is simple. Just follow these easy steps. A good title attracts viewers and keeps your content fresh. Regular updates show you care about your audience. Happy streaming!