How to Capture Duplicated Screen in Streamlabs: Easy Guide
Capturing a duplicated screen in Streamlabs is easy. It helps improve your stream quality.
Whether you’re a beginner or an experienced streamer, knowing how to duplicate your screen can enhance your content. Duplicating screens allows you to show multiple views, improving the viewer’s experience. Streamlabs is a popular tool among streamers. It offers many features, including screen duplication.
This feature can be useful for tutorials, gaming, or any content that needs multiple perspectives. By learning this skill, you can make your streams more professional and engaging. In this guide, we will walk you through the steps to capture a duplicated screen in Streamlabs. Let’s get started!
Setting Up Streamlabs
Setting up Streamlabs to capture a duplicated screen is simple. Open Streamlabs, add a display capture source, and select the screen to duplicate. Adjust settings for optimal quality.
Setting Up Streamlabs Setting up Streamlabs to capture a duplicated screen might seem daunting, but it’s straightforward with the right steps. Whether you’re a seasoned streamer or just starting, Streamlabs offers a user-friendly interface that simplifies the process. Below, we’ll guide you through downloading, installing, and configuring Streamlabs to get your duplicated screen captured efficiently.Download And Install
First things first, you need to download Streamlabs. Head over to the Streamlabs website and find the download button prominently displayed. Click it to start downloading. Once the download is complete, open the installer file. Follow the prompts to install Streamlabs on your computer. The process is quick and intuitive, ensuring you can get started without any technical hassles. After installation, launch Streamlabs. You’ll be greeted by a friendly setup wizard to help you configure the basics. This initial setup ensures everything runs smoothly right from the start.Initial Configuration
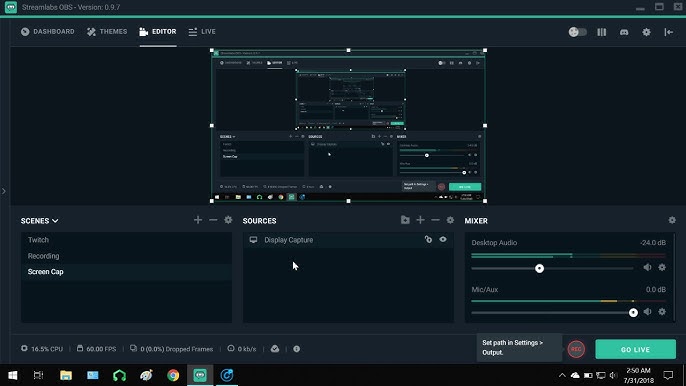
With Streamlabs open, it’s time to configure your settings. Start by logging into your account or creating one if you haven’t already. This step is crucial for saving your configurations and accessing advanced features. Next, navigate to the ‘Sources’ section. Click the ‘+’ button to add a new source. Choose ‘Display Capture’ to capture your duplicated screen. Adjust the settings for your display capture. Make sure you select the correct screen if you have multiple monitors. You can resize and position the screen capture to fit your stream layout perfectly. Finally, tweak the audio settings to ensure your viewers hear everything clearly. Test your setup by doing a short stream or recording. This step is vital to confirm everything works as expected. Have you ever wondered how seamless your streaming experience could be with the right setup? Dive into Streamlabs, follow these steps, and see the difference for yourself!Duplicating Screen Basics
Duplicating your screen in Streamlabs can take your streaming game to the next level. Whether you’re a gamer, a content creator, or someone who enjoys sharing your screen in real-time, duplicating screens can be incredibly useful. Let’s dive into the basics of duplicating screens and how it can enhance your streaming experience.
Why Duplicate Screens
Duplicating screens can simplify your setup. Imagine you’re streaming a game and you want to keep an eye on your chat without switching tabs. A duplicated screen allows you to do just that. It keeps everything you need in view, so you never miss a moment.
It’s also great for presentations. If you’re hosting a webinar or an online class, duplicating your screen can help you manage your materials more effectively. You can see your notes and your audience’s reactions simultaneously.
Ever had that frustrating moment when you needed to troubleshoot something mid-stream? With a duplicated screen, you can address issues without pausing your stream. It’s a game-changer for smooth, professional-looking broadcasts.
Common Uses
Gamers often use duplicated screens to monitor their live chat and stream health. It’s a seamless way to interact with viewers without interrupting gameplay. You’ll stay engaged and responsive, which keeps your audience hooked.
Content creators can use duplicated screens to manage multiple inputs. Imagine you’re cooking live and you have multiple cameras set up. A duplicated screen helps you switch views effortlessly, keeping your stream dynamic and engaging.
For remote work, duplicating your screen can make video conferencing a breeze. You can share your presentation while keeping an eye on meeting participants. It’s a practical way to stay organized and focused during virtual meetings.
Do you see how duplicating screens can be a game-changer for your streaming setup? It’s all about enhancing your workflow and keeping everything you need at your fingertips. Have you tried duplicating your screen in Streamlabs yet? What’s holding you back?
Configuring Display Settings
Capture duplicated screens in Streamlabs by configuring display settings. Follow easy steps to mirror your screen for seamless streaming. Ensure both screens show the same content for better viewer experience.
Capturing a duplicated screen in Streamlabs can be a game-changer for your streaming setup. One of the most crucial steps in this process is configuring display settings. Getting this right ensures that your viewers see exactly what you want them to see, without any glitches or poor-quality visuals. Let’s dive into how you can fine-tune these settings to enhance your streaming experience.Access Display Settings
First things first, you need to access the display settings. Open Streamlabs and navigate to the settings menu. You’ll find the settings icon at the bottom left of the screen. Click on it, and a new window will pop up. Here, you’ll see various options on the left sidebar. Select the “Video” tab to access display settings.Adjust Resolution
Once you’re in the video settings, the first thing you should focus on is the resolution. The resolution determines the clarity of your stream. For most streaming platforms, a resolution of 1920×1080 is ideal. Adjust the base (canvas) resolution to match your screen’s native resolution. Then set the output (scaled) resolution to the desired quality. If you have a lower-end PC, you might want to lower the output resolution to 1280×720 to ensure smooth performance. Fine-tuning these settings can significantly improve your stream’s quality. Have you ever wondered why your stream looks blurry sometimes? It might be due to incorrect resolution settings. So, take a moment to get these right. By carefully configuring your display settings, you’re setting the stage for a smooth and visually appealing stream. These small tweaks can make a big difference. What other settings have you found useful in Streamlabs? Share your thoughts!
Credit: whitetestscreen.com
Adding Display Capture Source
Streamlabs makes it easy to capture your screen for streaming or recording. Adding a display capture source is a simple process. This feature allows you to show your entire screen or a specific window. Follow these steps to add a display capture source.
Navigate To Sources
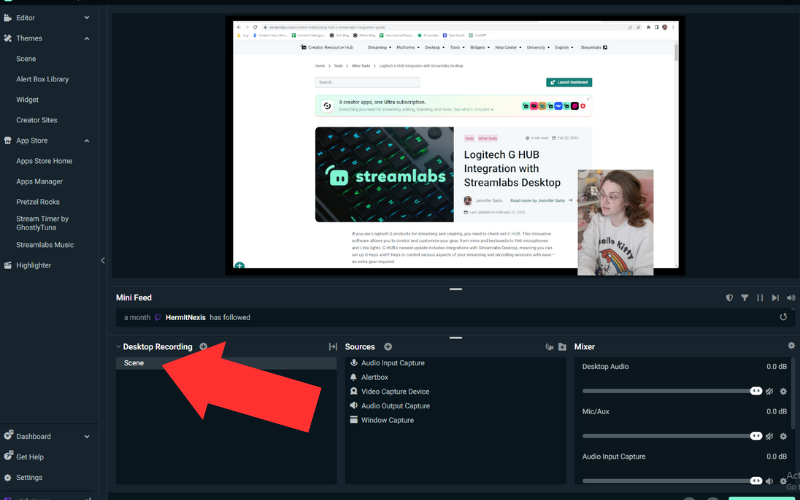
Open Streamlabs on your computer. You will see a section labeled “Sources” at the bottom of the screen. This is where you add different types of content for your stream.
Click the “+” button to add a new source. A menu will pop up with different options.
Select Display Capture
From the menu, choose “Display Capture.” This option allows you to capture your entire screen or a specific window. After selecting “Display Capture,” click “Add Source.” A new window will appear.
In this new window, you can name your source. Pick a name that helps you remember what this source is. After naming your source, click “Add New Source.”
Next, choose the display you want to capture. If you have multiple monitors, select the one you need. Click “Done” to finish adding your display capture source.
Your screen is now ready for streaming or recording. You can adjust the size and position of the captured screen within Streamlabs. This makes it easy to show exactly what you want.
Configuring Display Capture
Configuring Display Capture in Streamlabs is essential for ensuring that your stream is visually appealing and professional. When you want to capture and share your screen, it’s crucial to set it up correctly. This guide will help you understand how to do that effectively.
Choose Display
First, you need to select which display you want to capture. Open Streamlabs and navigate to the “Sources” box. Click on the plus sign (+) to add a new source.
From the list, choose “Display Capture” and give it a name that you can easily recognize. Once you click “Add Source,” a new window will appear showing all the displays connected to your computer. Pick the one you want to capture and click “Done.”
Isn’t it simple? This step ensures that you are capturing the right display, especially if you have multiple monitors. It helps avoid confusion during your live stream.
Customize Settings
Now that you have chosen the display, it’s time to customize the settings. Right-click on your newly added display capture source and select “Properties.”
Here, you can adjust various settings like resolution and frame rate. You might want to match the resolution with your monitor for optimal quality. You can also choose to capture your cursor or not, depending on your preference.
These settings allow you to fine-tune what your viewers see. For instance, if you’re doing a tutorial, capturing the cursor can be helpful. On the other hand, for gaming streams, you might want a cleaner look without the cursor.
Have you ever struggled with blurry or laggy screens during a live stream? Adjusting these settings can solve those problems, ensuring a smooth viewing experience for your audience.
Take a moment to explore these settings and see what works best for your content. After all, a well-configured display capture can make a significant difference in your stream’s quality. What settings do you find most useful?
Credit: streamlabs.com
Testing The Setup
Test your Streamlabs setup by capturing a duplicated screen. Open Streamlabs, go to settings, and select “Display Capture. ” Ensure the right display is chosen for flawless screen duplication.
Testing the Setup Testing your setup is crucial when capturing duplicated screens in Streamlabs. This ensures everything runs smoothly during your live stream. Here’s how you can do it effectively.Preview The Output
First, click on the “Preview” button in Streamlabs. This allows you to see how your duplicated screen will look to your viewers. Check for any misalignments or errors. Adjust the screen size or position if needed. Ensure your audio is in sync with the video. You don’t want your viewers to get frustrated with lagging sound.Troubleshooting Tips
If you notice any issues, don’t panic. Here are some quick fixes: – Screen not appearing? Verify that you’ve selected the correct screen in the settings. – Laggy output? Lower the resolution or frame rate in Streamlabs settings. – Audio issues? Ensure your microphone and desktop audio are properly configured. Run a test stream to a private channel. This lets you see how everything performs without a live audience. It’s a great way to iron out any kinks before going live. Have you encountered any unique challenges while setting up your stream? Share your experience in the comments. Your insights could help fellow streamers improve their setups. Engaging your audience is key. Make sure your duplicated screen enhances their viewing experience, not detracts from it.Optimizing Performance
Optimizing performance in Streamlabs is crucial for a smooth streaming experience. Capturing duplicated screens can strain your system. This can lead to lag and poor quality. By optimizing performance, you can provide a better viewing experience for your audience. Let’s dive into some key areas to focus on.
Adjusting Bitrate
Bitrate affects the quality and smoothness of your stream. A high bitrate can cause lag if your internet speed is low. Balance the bitrate to match your upload speed. This ensures a stable stream. Start with a bitrate of 2500 kbps. Adjust it based on your internet performance.
Enhancing Quality
Quality settings impact how your stream looks. Lowering resolution can reduce the strain on your system. Try streaming at 720p instead of 1080p. This can help if your system is struggling. Also, adjust the frame rate. Streaming at 30 FPS can ease the load compared to 60 FPS.
Use the “Performance” preset in Streamlabs. This setting optimizes your system for smoother streaming. It reduces unnecessary background processes. Keeping your system cool also helps. Overheating can cause performance issues.

Credit: help.databox.com
Frequently Asked Questions
How Do You Duplicate On Streamlabs?
To duplicate in Streamlabs, right-click the source you want to duplicate, then select “Duplicate”. This creates an identical copy.
How To Record Dual Output Streamlabs?
Open Streamlabs, go to Settings, select Output, and enable Advanced Output Mode. Configure dual output settings and start recording.
How To Run Two Instances Of Streamlabs?
Open Streamlabs twice by using different Windows user accounts or third-party software like Sandboxie.
How To Screen Mirror On Streamlabs?
To screen mirror on Streamlabs, add a new source, select “Display Capture,” choose your screen, and click “Done. ” Adjust settings as needed.
Conclusion
Capturing a duplicated screen in Streamlabs is simple with the right steps. Follow the guide and you can easily set it up. This helps improve your streaming quality. Practice the steps to become more comfortable. Soon, it will feel like second nature.
Happy streaming and enjoy creating great content!