How to Get Discord Audio on Twitch Stream: Ultimate Guide
Streaming on Twitch is fun, but adding Discord audio can make it better. Here’s a quick guide to get Discord audio on your Twitch stream.
Streaming with friends or interacting with your community can enhance the viewer experience. By including Discord audio, your streams can become more engaging and lively. This guide will show you how to integrate Discord audio into your Twitch stream. From setting up your audio settings to ensuring clear communication, you will find all the steps you need.
Ready to make your streams more interactive? Let’s dive in and get that Discord audio onto your Twitch stream!
Setting Up Discord
Setting up Discord to get its audio on your Twitch stream can be a game-changer. It’s essential to ensure you have clear, high-quality audio from your Discord server. This section will guide you through the steps to create a server and configure voice channels.
Creating A Server
First, you’ll need to create a Discord server. Open Discord and click on the ‘+’ icon on the left sidebar. Select ‘Create a Server’ and follow the prompts to name your server and choose a region. Personalize it to match your stream’s theme.
Once your server is created, invite your friends or collaborators. This server will be your hub for all voice and text communication during your Twitch streams.
Configuring Voice Channels
Next, you need to set up voice channels. Click on your server name at the top of the sidebar and select ‘Create Channel’. Choose ‘Voice Channel’ and give it a name. Make it specific, like ‘Stream Chat’, for easy identification.
Adjust the voice settings by clicking on the gear icon next to the channel name. Set the bitrate to high for better audio quality. You can also manage permissions to control who can speak or join the channel.
Remember, your Discord audio quality can significantly impact your stream’s overall experience. How often have you been annoyed by poor audio quality on a stream? With these settings, you ensure clear communication and a better viewer experience.
Ready to take your Twitch stream to the next level? What features do you think would further enhance your Discord setup for streaming?
Preparing Twitch
Preparing Twitch for streaming your Discord audio can seem like a daunting task, but it’s pretty straightforward once you break it down. This is the stage where you’ll ensure your Twitch account is ready and linked to Discord, so your stream runs smoothly. Let’s get started with the basics and move on to linking your accounts.
Setting Up Your Twitch Account
First things first, make sure you have a Twitch account. If you don’t, head over to Twitch and sign up. It’s free and only takes a few minutes.
Once you have your account, customize your profile. Add a profile picture and a bio. This will help your viewers know more about you. Personal touches make your channel more engaging.
Next, go to your Twitch dashboard. Here you can adjust your stream settings. Make sure your stream key is secure. You’ll need this to connect your streaming software later.
Linking Discord With Twitch
Now, let’s link your Discord account with Twitch. Open Discord and navigate to your User Settings. It’s the gear icon next to your username.
In User Settings, find the Connections tab. Click on the Twitch icon. You’ll be prompted to log in to your Twitch account. Enter your credentials and authorize the connection.
Once linked, you can manage the integration. You can sync your Twitch subs to your Discord server. This allows your subscribers to access special channels and perks on your Discord.
Have you considered how this integration can enhance your community? Linking your accounts makes it easier for your followers to stay connected with you. It also helps in building a loyal community around your content.
Are you ready to take your Twitch streams to the next level? Setting up and linking your accounts is the foundation. With these steps complete, you’re well on your way to streaming Discord audio on Twitch.
Using Obs For Audio Capture
Discord is a popular tool for gamers to communicate while playing, and getting its audio on your Twitch stream can be a game-changer. One efficient way to do this is by using OBS Studio. OBS (Open Broadcaster Software) is a free and open-source software for video recording and live streaming. Let’s dive into the process of capturing Discord audio using OBS Studio.
Installing Obs Studio
First, you need to install OBS Studio. Head over to the OBS Project website and download the software for your operating system. The installation process is straightforward, and you should follow the prompts to complete the setup.
Once installed, launch OBS Studio. You might feel overwhelmed by the interface at first, but don’t worry; it’s user-friendly once you get the hang of it. Think of it as your control center for streaming.
Configuring Audio Settings
Now that OBS Studio is up and running, let’s configure the audio settings. Start by clicking on the “Settings” button at the bottom right of the OBS window. Navigate to the “Audio” tab. Here, you can set your audio devices.
Ensure your desktop audio device is set to your default playback device. This is usually where your Discord audio will be output. Next, make sure your microphone is selected as the “Mic/Auxiliary Audio Device”. This will capture your voice during the stream.
To capture Discord audio specifically, you can use audio filters. Go to your audio mixer, click on the gear icon next to your desktop audio, and select “Filters”. Add a “Noise Gate” and “Noise Suppression” filter to clean up your audio. This ensures that only the necessary sounds make it to the stream.
One personal tip: Test your audio settings before going live. There’s nothing worse than realizing your audio isn’t working mid-stream. Trust me, I’ve been there.
Isn’t it exciting to know you have control over what your audience hears? By following these steps, you can ensure your Discord conversations are part of your Twitch stream, making it more interactive and engaging for your viewers.
What audio challenges have you faced during streaming, and how did you overcome them? Sharing your experiences can help others in the community. Happy streaming!
Credit: www.youtube.com
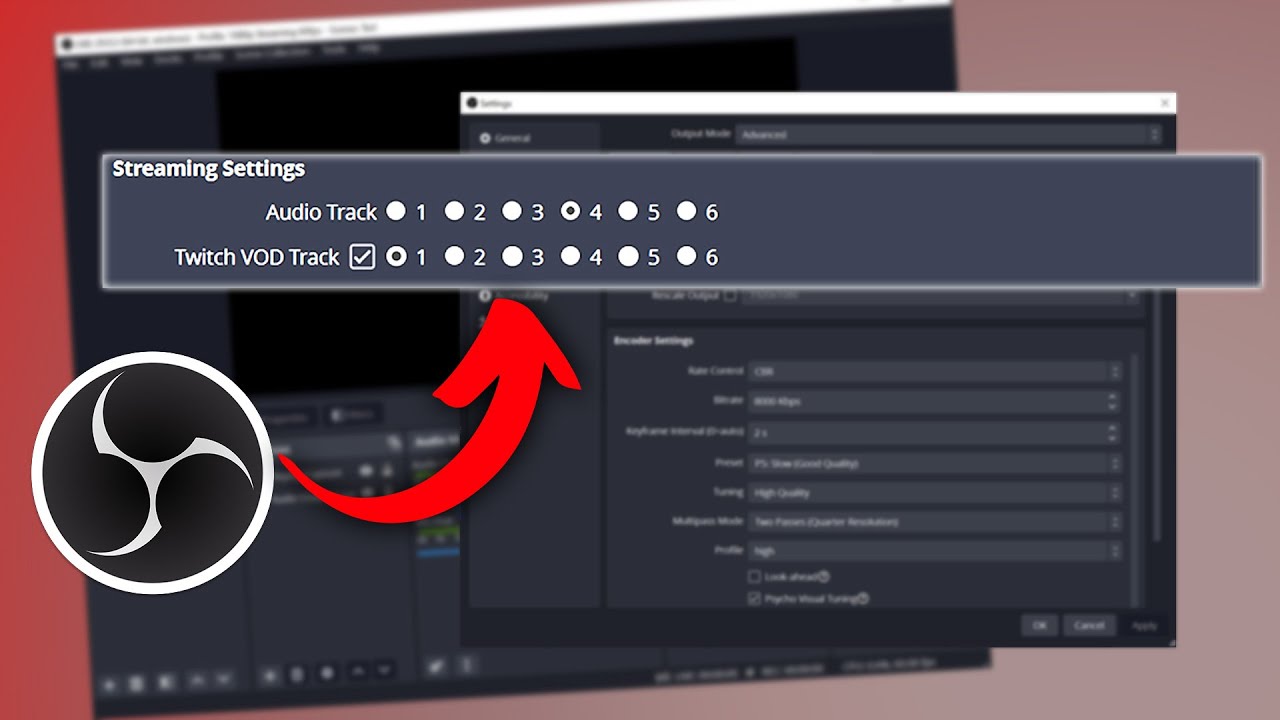
Adding Discord Audio To Obs
Adding Discord audio to OBS can elevate your Twitch streams. It allows real-time communication with your audience or teammates. This guide will show you how to set up and test Discord audio in OBS.
Setting Up Audio Output Capture
First, open OBS Studio on your computer. Navigate to the “Sources” box at the bottom. Click the “+” icon to add a new source. Select “Audio Output Capture” from the list. A new window will pop up. Name your new source “Discord Audio” and click “OK”.
Another window will appear. Click the drop-down menu next to “Device”. Select the audio device that plays your Discord audio. This is usually your default speakers or headphones. Click “OK” to confirm.
Testing Audio Levels
Now, it’s important to test your audio levels. Join a voice channel on Discord. Speak or play some audio through Discord. Look at the audio mixer in OBS. Find the “Discord Audio” source you created. You should see the volume levels moving.
If the levels are too high or too low, adjust them. Click the gear icon next to “Discord Audio”. Select “Filters” and add a “Gain” filter. Adjust the gain until the levels are balanced. Make sure your viewers can hear the Discord audio clearly. But avoid any distortion or clipping.
That’s it! You’re ready to stream with Discord audio on Twitch. Enjoy real-time interaction with your audience and friends.
Enhancing Audio Quality
Enhancing audio quality on your Twitch stream can make a big difference. Clear and balanced sound keeps your audience engaged. It helps them enjoy the content without distractions. Let’s explore some ways to enhance your Discord audio quality on Twitch.
Using Filters And Plugins
Filters and plugins can improve your audio quality. Noise suppression filters reduce background noise. This makes your voice clearer. You can also use equalizers. They adjust the balance of frequencies. This ensures your voice sounds natural and pleasant.
Consider using a compressor. It keeps your audio levels stable. Your voice won’t be too loud or too soft. Many streaming software options have built-in filters and plugins. Experiment with them to find the best settings for your stream.
Balancing Game And Voice Audio
Balancing game and voice audio is crucial. If one is too loud, it can drown out the other. Start by lowering your game audio. This makes sure your voice stands out. Your audience wants to hear you clearly.
Use your streaming software’s audio mixer. Adjust the game and voice levels until they blend well. Test the balance before you go live. Ask friends or viewers for feedback. Their input can help you find the perfect mix.
Troubleshooting Common Issues
Streaming on Twitch with Discord audio can sometimes lead to issues. These can disrupt the quality of your stream. This guide will help you solve the most common problems. With these tips, you can ensure a smooth streaming experience.
Fixing Audio Lag
Audio lag can be frustrating. First, check your internet connection. A slow connection can cause delays. Close background applications that use bandwidth. This will free up resources for your stream.
Next, adjust your Discord settings. Go to “Voice & Video” in Discord settings. Lower the “Input Sensitivity” and “Output Volume”. This can reduce lag. If the issue persists, update your audio drivers. Outdated drivers can cause audio lag.
Resolving Connection Problems
Connection problems can stop Discord audio from working on Twitch. Start by checking your connections. Ensure your microphone and headphones are plugged in properly. Test them on another device to ensure they are working.
Next, check your Discord and Twitch settings. Make sure they are set up correctly. In Discord, go to “Voice & Video” settings. Select the right input and output devices. In Twitch, ensure your audio source is set to Discord.
If you still face issues, restart your computer. Sometimes, a simple restart can fix many problems. Finally, keep your software updated. Both Discord and Twitch release updates to fix bugs and improve performance.
Advanced Tips
Navigating the world of streaming can be tricky. Especially when incorporating Discord audio into your Twitch stream. Beginners often stick to basic setups, but advanced users can benefit from more sophisticated techniques. These advanced tips can elevate your streaming quality. You’ll gain better control over your audio and enhance viewer experience.
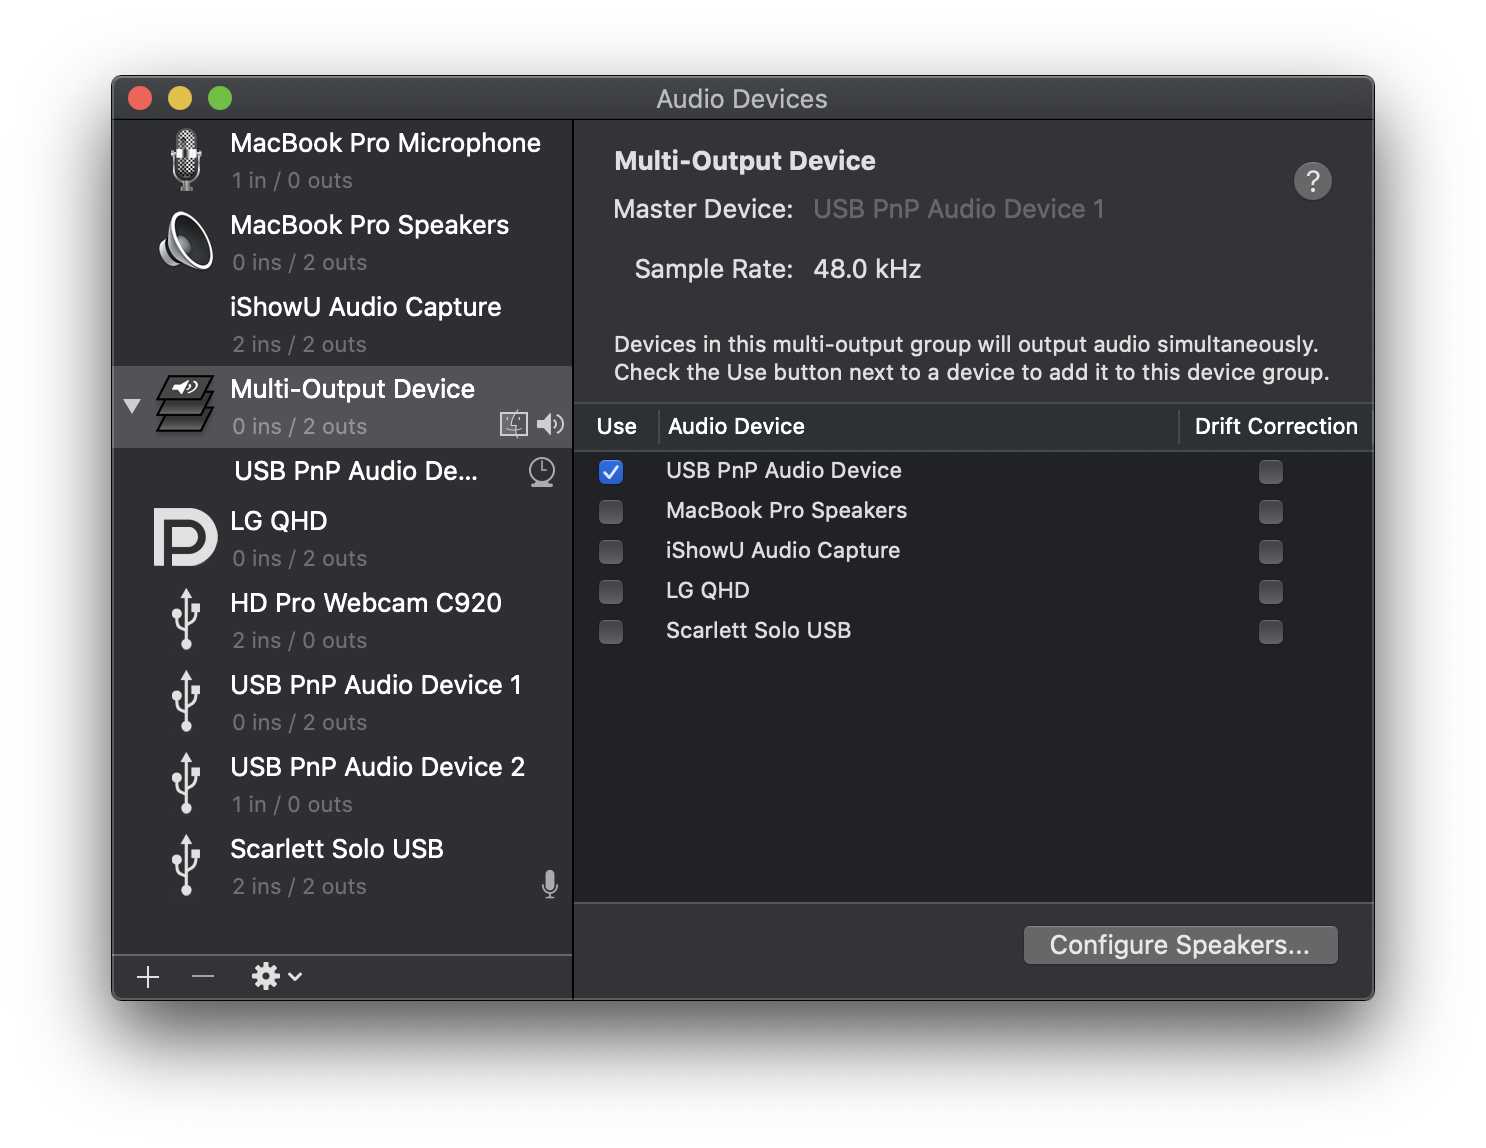
Using Virtual Audio Cables
Virtual Audio Cables (VAC) are powerful tools for streamers. They help route audio from one application to another. This technique is ideal for integrating Discord audio into your Twitch stream. Install a VAC application like VB-Audio. Create virtual cables to separate Discord audio from other sounds. Assign the virtual cable as the output device in Discord settings. Then, set it as the input device in your streaming software. This setup ensures clear and isolated Discord audio in your stream.
Managing Multiple Audio Sources
Managing multiple audio sources can enhance your stream’s professionalism. Use software like OBS Studio to organize audio inputs. Create separate audio tracks for game sounds, microphone, and Discord. Adjust the volume levels for each source individually. This control helps balance the audio mix. Your viewers will appreciate the improved sound quality. Remember to test your audio setup before going live. This step ensures everything works smoothly.
Credit: support.discord.com
Credit: www.youtube.com
Frequently Asked Questions
Why Can’t My Twitch Stream Hear Discord?
Your Twitch stream can’t hear Discord due to incorrect audio settings. Ensure Discord and Twitch audio sources are properly configured in your streaming software. Check audio input/output settings on both platforms.
How Do I Make Discord Audio Heard On Stream?
To make Discord audio heard on stream, use OBS or Streamlabs. Add a new audio source, select Discord as the source, and adjust volume settings. Ensure your Discord audio settings allow output to your streaming software.
How To Include Discord Audio In Twitch Stream Obs?
To include Discord audio in your Twitch stream on OBS, add a new audio input source. Select your Discord audio device.
How Do I Share Discord Audio On Stream?
To share Discord audio on stream, use screen share with audio enabled. Select the application or screen to stream. Ensure your streaming software captures the audio.
Conclusion
Getting Discord audio on your Twitch stream is easier than you think. Follow these steps, and you’ll improve your stream’s quality. Your viewers will appreciate the clear communication. Try it out today and see the difference. Happy streaming!